I mentioned yesterday that I needed a bit of help setting some things up. I still do but as I’ve searched I’ve found a wealth of information out there. Unfortunately there seems to be less and less as time goes by so I am going to try and repost some of it here and save for posterity. This site’s been up for almost 13 years now and I don’t plan on taking it down any time soon. I’ve come across this tutorial in several places but I think it needs to be updated and also kept with setups for other stuff as well.
Graphical Setup Tutorial for Argus
by David Moufarrege HTML version of this document and low.res. images are made by Max Masyutin
Original version of this document is available in http://www.filegate.net/ipfn/i-util/ATUTHLP.ZIP
Modified slightly to remove dead links by Janis Kracht 03/17/03
Further modified by Richard Miles 11/14/2012 – I’ve hosted all of the images on my system here and linked to them rather than the original site. Argus is no longer supported or updated but most of the information below is still valid.
This document contains screen shots and instructions to setup a basic Argus system. There are many more things you can do to automate and make life easier, but following these steps will get you started!
- I assume no liability what so ever if you follow any of the steps outlined below. I am simply showing what I had to do to setup my Argus system.
- My thanks goes to the following people:
- Max Masyutin – for writing Argus
- Sean Rima – for promoting it, helping me and other with its setup
- Lothar Behet – for promoting the use of IP-class Fidonet mailers and his IP flag proposal
- David Hallford – for creating the IPNODELST extract from the Fidonet nodelist
- Bob Satti and Ward Dossche – for having the vision to permit and promote the use of IP – Mailers, Flags and Nodelist entries in their respective zones.
- Pat (www.nestsoft.com) for writing a great freeware program that made the screen captures possible:
Step #1
UnRAR, UnZIP or otherwise de-arc the Argus files into a directory of your choice. For purposes of this tutorial I have used C:ARGUS (how original! )
Step #2
Double click on ARGUS.EXE
This is what you’ll see:

Read the license agreement and click on “Agree” if you want to continue and agree with the terms.
Step #3
If you are running a regular Fidonet mailer and Argus is supposed to replace that mailer check “Modem for direct dial-up:”
If you want to use the IP functions make sure you’ll also check “TCP/IP connections:”

Step #4
Enter your area (or city) code, select pulse or tone dialing, and select your modem’s (or primary modem’s) comport

Step #5
The screen below will appear. There is a slight delay before the “OK” appears. A good reason to register:

Step #6
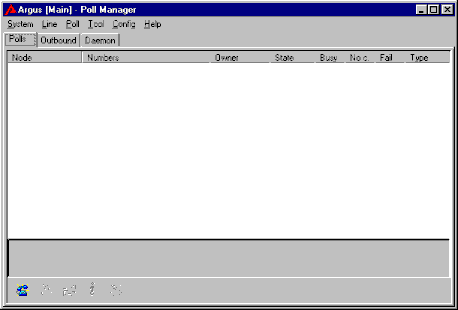
You have reached the main screen. From here you’ll configure and control all Argus functions. Once the mailer lines are open you will see additional tabs appear.
Step #7
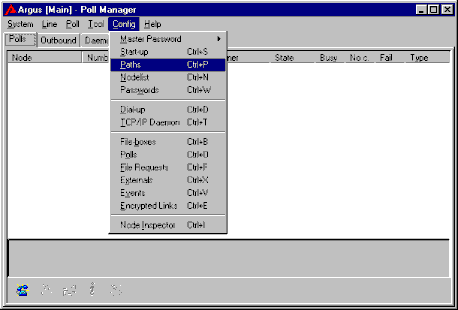
Let’s start configuring:
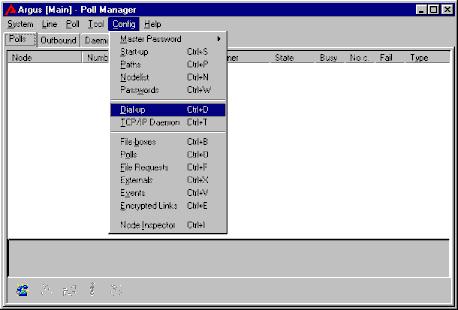
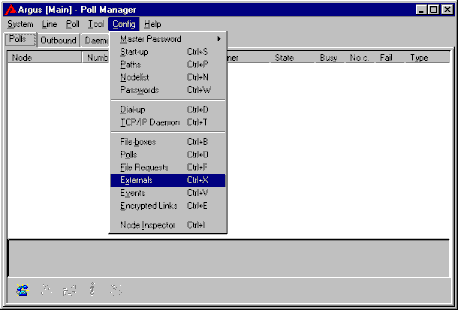
Go to CONFIG -> PATHS
This is how the default window appears. Change your default Zone to reflect your Zone number. I suggest leaving all other settings as they are.

Step #8
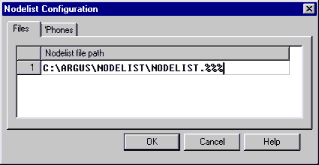
Go to CONFIG -> NODELIST

This is the nodelist configuration. The following window shows how you enter the default Fidonet nodelist.
This is the dial configuration. The following window shows the way I had to setup my mailer:
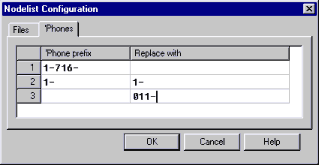
- Line 1: All entries beginning with “1-716” are dialed without the “1-716”
- Line 2: All entries beginning with “1-” are dialed just like they appear in the nodelist
- Line 3: All other entries (starting other country codes) are dialed with 011- in front of it. 011- is the “international dial code”, similar to 00 in many other countries.
Step #9
Next… passwords.

Here you have the option of importing an existing password file, i.e. from FrontDoor, InterMail, etc. simply push the import button, choose the correct file format and off you go. You can also manually enter the passwords,

Or specify a text file which is loaded at start-up and contains the passwords. The syntax of the text file is node|password – one node per line.

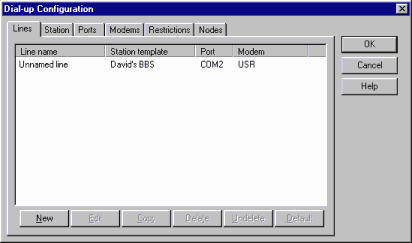
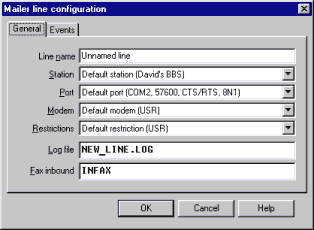
Step #10
Mailer line configuration
Start with the second tab:
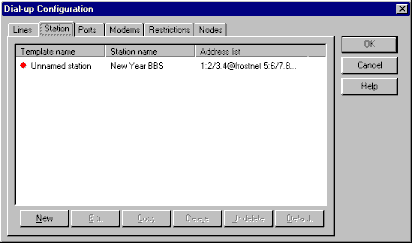

Change the above defaults to reflect your correct information, as shown below. Make sure to change the “Template Name” to your system name.


As you can see, the template name changed:

Step #11
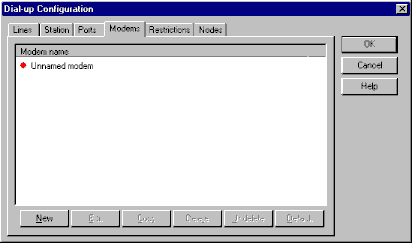
Configure the modem(s)


Step #12
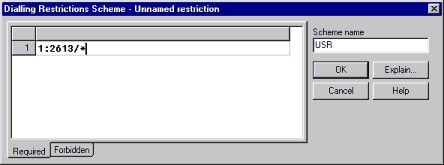
Restrictions…


Step #13
Now on to the line:

That completes the dial-up section…
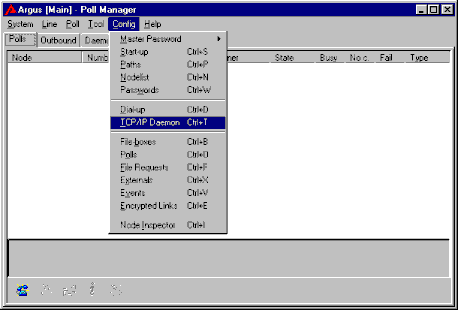
Step #14
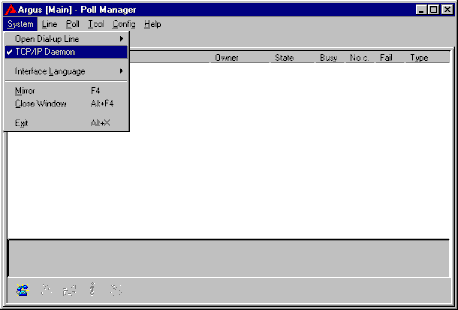
Now on to the TCP/IP daemon configuration:
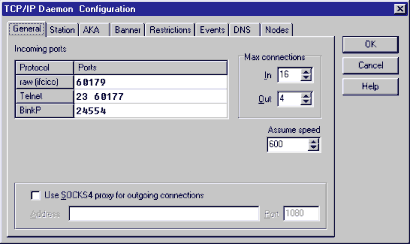
This section requires a little more explanation to the TCP/IP rookie. Just like there are several modem I/O ports (i.e. COM ports), TCP has multiple ports. As a result, you can tell your mailer to “listen” on multiple ports at a time. However, just like a modem port, only one device can listen at a time.
Therefore, if you plan on running a telnetable BBS on the standard telnet port (23), you must remove port 23 from the TCP/IP port listing. I suggest you add port 3141 (SIO/Vmodem) to the list of telnetable ports. The beauty with this setup is that is does not interfere with your BBS operations.


Make sure you enter TCP into the “required” section…

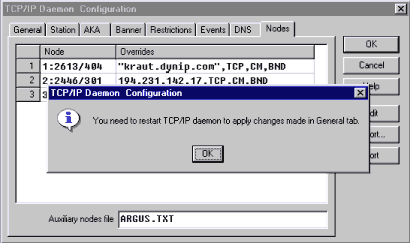
Here comes an important section:
The nodelist was originally not designed to contain IP addressing and protocol information. Fidonet inherently was a “modem” network. Therefore, all IP information has to be entered as an override to the standard nodelist information.
There are several ways to accomplish this.
- You can manually enter the information.
- You can import the information from the ARGUS.TXT file contained in INODELST.Z**, which is a weekly file in the INODELST file echo.
- You can specify ARGUS.TXT as an auxiliary file.

The above three entries show different ways of entering the IP information.
All FQDN (Fully Qualified Domain Names) must be put into quotation marks. The node must show a “TCP” flag and a protocol flag. If an on-line flag, such as “CM” is shown Argus will honor those times.
IP numbers do not go into quotation marks, and non-standard ports, such as “10023” for telnet are entered as shown in line three.
In order to import ARGUS.TXT DO NOT USE THE IMPORT BUTTON ! Simply right-hand mouse click on the grid and use the import function from the resulting drop down menu.
To use ARGUS.TXT, or any other text file you create, as an auxiliary file simply specify the file name. The file must be located in the Argus system directory.
When you’re done, save the information and restart the daemon:
Step #15
Unlike a DOS mailer, Argus does not exit with an error level when it receives mail or files. Rather, it calls a specified batch file…
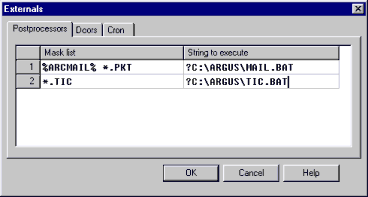
%ARCMAIL% collectively specifies Fidonet ARCmail packets ending in .M01, .TU2, WE8, etc. When such a file is received, MAIL.BAT is called. The “?” question mark specifies to run the batch job hidden in the background.
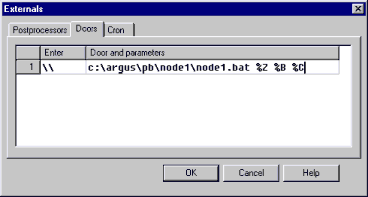
In order to run Argus as the front end of a dial-up BBS you specify a command line similar to this one, calling a batch file:
The two back slashes symbolize the double ESC sequence.
Step #16
Configuring your start-up settings:

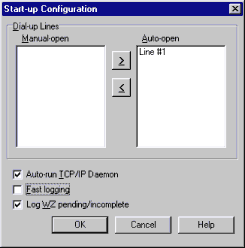
If you want your mailer line to open automatically upon start-up move the modem line to Auto-Open. Likewise, if the TCP/IP modem should answer at startup check the appropriate box.
A word on “Fast Logging”: If you use any utility that chops, trims, or otherwise accesses your logs uncheck the box.
Guess what:
That’s it. You should have a working setup.
Leave a Reply